Extreme Sample Stretching
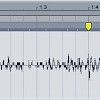
Stretching out audio can do magical things to it: hidden melodies appear, transients crumble into blurs, and tiny blips of sound turn into rich soundscapes. Most digital audio workstations can do simple stretches; for something more drastic, though, you’ll need a dedicated program like Paul’s Extreme Sound Stretch. In this tutorial, I’ll use Paul’s Sound Stretch to turn a field recording of Vancouver’s Gastown steam clock into a rich, pad-like synth sound. Here’s what the unaltered recording sounds like, background noise and all:
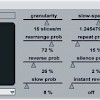
Let’s turn that recording into music. Open the audio file in Paul’s Sound Stretch. Drag the “Stretch” slider up to around 400x, and set the “Window Size” slider to around .10 seconds. Hit the “Play” button at the bottom to listen to the stretched sample; drag the “Percent” slider to jump forward or backward in the stretched recording.

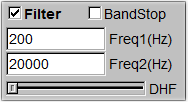 Now that our sample’s stretched out to a ridiculous length, let’s add some processing to make it more usable as a musical element. Click the “Process” tab in Paul Stretch, then turn on the filter. The “Freq1″ text field in the filter section controls the hi-pass frequency; the “Freq2″ field sets the low-pass. Configure the filter to cut out everything below 200 Hz and above 20 kHz. It takes a few seconds for Paul Stretch to apply processing effects to the audio, so you’ll notice a slight lag if you’re listening to the sample while you’re adjusting the settings.
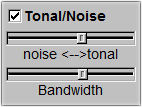 Even after filtering out the lowest and highest frequencies, our field-recorded sample still has quite a bit of noise in it. Turn on the “Tonal/Noise” processing box, and slide the “Noise/Tonal” slider just a little closer to the “Tonal” side. This will reduce the background noise levels without making the recording lose too much of its character.
 To make the stretched sample more musical, let’s add additional voices to it. The “Octave Mixer” function in Paul’s Extreme Sound Stretch shifts a copy of the sample’s pitch up or down, then mixes the shifted sample in with the original. Make the sample sound richer by dragging the “-1″ and “1″ sliders around three-quarters of the way up, then add a little brightness by dragging the “1.5″ and “2″ sliders slightly up.
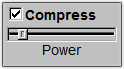 Finally, even out the sample’s volume level by adding a touch of compression. Export the stretched sample by selecting “Render and save audio” from the “File” menu. This will take a little while, but not as long as you’d think.
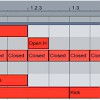
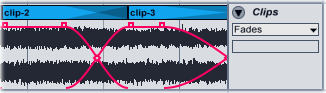
So now you’ve got a half-hour of beautiful but kind of unusable audio. For the next step, open the stretched sample in your digital audio workstation (I’m using Ableton here, but any DAW will work). Skip through the stretched sample, listening for nice-sounding parts; when you find a likely section, copy and paste it into a different audio channel. Grab a few sections of sound, then turn off the stretched sample’s audio channel. Now it’s time to get creative. Try arranging the clips consecutively, then slowly crossfade between them (in Ableton, select “Fades” from the channel’s Device Chooser menu, then click and drag the handles that appear).
If you want even more control over the sample, drop it into a sampler plug-in; you can then play MIDI notes with it, apply filter and pitch modulation, and so on. Alter the sound’s volume envelope (try a short attack, medium decay, and zero sustain), create a multi-sample using the different clips: the possibilities are nearly endless.
Finally, we’ll polish up the sample using a few effects. Use an EQ plugin to cut the harsh frequencies and boost the good ones, then add some reverb and delay to smooth out the sound. Here’s what the field recording sounds like now (mixed with a drum loop):